↓
 

Simply Said With Karen

Paper Crafting For All

  • Home
  • Blog
  • Stampin’ Up! Online Store
  • On Line Classes
  • View Our Catalogues
  • Event Calendar
  • Cool Tool Tip Videos
  • Questions and Answers
  • Simply With Heart – Etsy Store
  • Gift Certificates
  • Privacy Policy
  • Contact Me
Home << 1 2 … 73 74 75 76 77 >>

Post navigation

← Older posts
Newer posts →

Using the Versa Mark Marker

Simply Said With Karen Posted on May 22, 2010 by Karen GilbertMay 22, 2010

Hi Everyone and welcome to the weekend.  For some of us it is a long weekend with Victoria Day falling on the Monday.  It is a cloudy day and not very warm, so I’m very glad that I cleaned off the deck yesterday.  Even though it wasn’t warm, at least the sun was shining.

The card I am sharing today is for a friend who lost her 12 year old grandson to cancer.  Such a sad occassion and my thoughts are truly with her.  No one should have to go through the loss of a child or grandchild.

The inspiration for this card came from Kristin Moore over at Split Coast Stampers
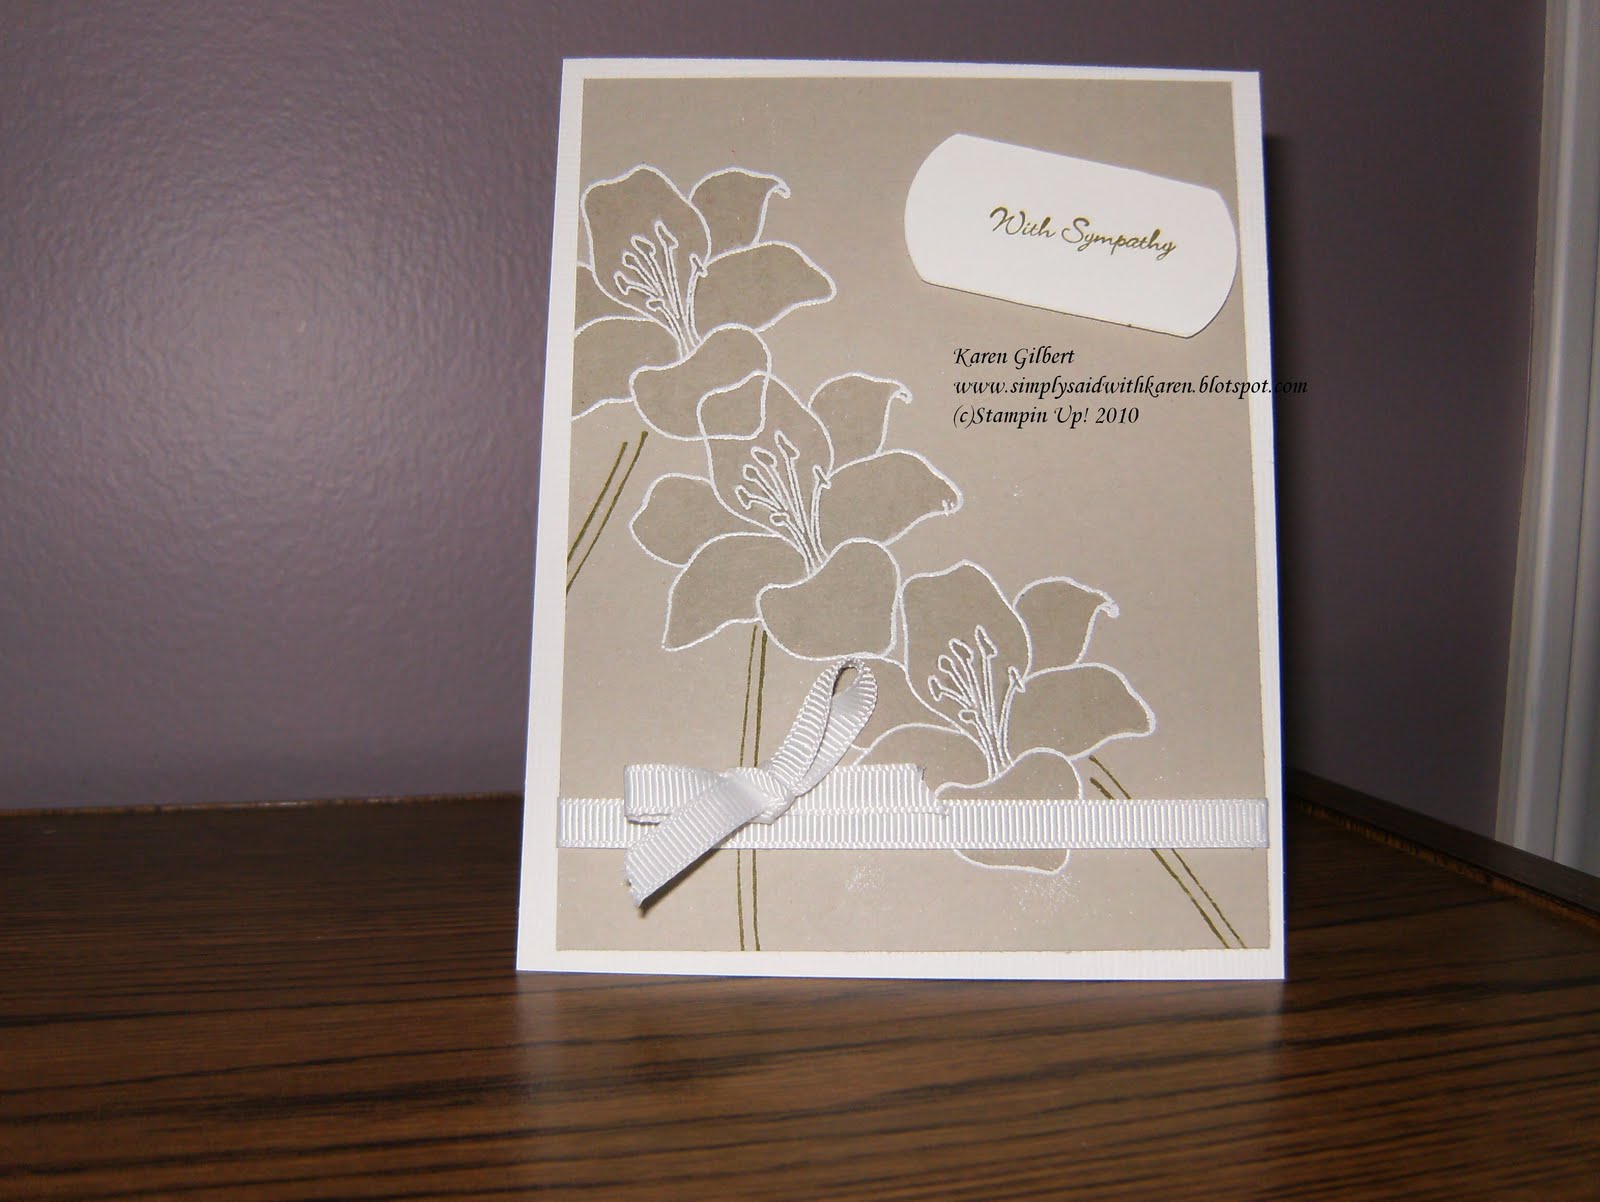
Recipe

Stamps: Fifth Avenue Floral, Teeny Tiny Wishes
Paper: Whisper White, Sahara Sand

Ink: Old Olive
Accessories: Versa Mark (Ink Pad and Marker), White Embossing Powder, Whisper White Grosgrain Ribbon, Cricut George Shapes (Cylinder)

 
1. The card base is Whisper White and the dimensions are 51/2 x 41/4.

2. On the Sahara Sand layer, the Lilies from the Fifth Avenue Floral set were stamped randomly using Versa Mark and embossed with White EP, the stems were stamped using Old Olive. The lilies were coloured in using the Versa Mark marker and stamens coloured with old olive.

3. The sentiment was stamped using old olive on the whisper white tag and attached with dimensional.

4. Finally the ribbon was attached to the bottom of the layer.

Now, I’m off to clean up my office………….yuck

Until next time……
Karen

Posted in Fifth Avenue, Sympathy

“Light the Way”

Simply Said With Karen Posted on May 20, 2010 by Karen GilbertJune 21, 2024

Hi Everyone:  The card I am sharing today is based on a challenge over at  Jax Bean Stock .  It’s open to everyone so give a check.  There is some blog candy waiting for someone on Monday.  The challenge was created by Jennipher Lowery and there is a special prize for someone who visits Jennipher Lowery’s blog, becomes one of her followers, and leaves her a comment on her current post for that day and mentions her Sketch for the CSN challenge here at Jax Bean Stalks.

The sketch is to be intrepretated as “light” and there are so many possibilities.  The “light” in my card is the sunlight, daylight and of course the light from the candles lighting your way to the birthday cake.  Ok so how many time did I use “light” in that sentence.  Should be worth something.

Actually this card is for Lloyd’s Dad who will be 86 years young in June so the sentiment on the card is very appropriate.


Stamps: Happy Moments, Whimsical Words
Paper: Whisper White, Bermuda Blue, Crushed Curry, Sweet Pea DP
Ink: Black Stazon, Chocolate Chip
Accessories: Big Shot, Label die cut – Matchbox Die, Pastels, Dazzling Diamonds


1. The card base is Crushed Curry and the dimensions are 51/2 x 41/4
2. A strip of Sweet Pea DP was layered on the card base
3. The Birthday Cake from Happy Moments was stamped on Whisper White with the cake plate, and flowers coloured using the pastels. Dazzling Diamonds glitter was applied to the flame on the candles.
4. The Whisper White layer was layered onto the Bermuda Blue and then attached on an angle to the card base
5. The sentiment was stamped using Chocolate Chip and attached to the card using a dimensional.

Posted in Birthday, Challenges

Stampin Up Demonstrator

Simply Said With Karen Posted on May 17, 2010 by Karen GilbertMay 17, 2010

Hi Everyone:  We are just finishing up with a down pour…a good thing, along with lightening…not a good thing and thunder.

I have not posted a card today as I want to let everyone know that I have signed up as a Stampin Up demonstrator and you will notice that my blog will have some changes, links and other goodies.  I am very excited as this is an opportunity to share with others, meet new people, and have FUN.  FUN being the operative word.  Right now I am waiting for my start up kit…I love to get things in the mail

So check out the links on my blog as I add the new features and generally have fun making the changes. 
You can place a Stampin Up order 24-7, check out the products and ideas, host a workshop, and become a demonstrator as I have.

Just click on the link that says “Shop 24-7” and it take you right my Stampin Up website.

Have a good rest of a Monday and I will have a card for you next time and until then……………

Karen

Posted in Stampin Up

Happy Birthday Maya

Simply Said With Karen Posted on May 14, 2010 by Karen GilbertJune 21, 2024

Hi Everyone and it’s Friday.  The weather is incredible, 28 in celsius and about 86 fahrenheit…so you don’t have to convert either way.  And any way you look at it, it’s pretty nice LOL.

The card I am sharing today is for Maya who turns 1 in a couple of weeks.  Maya is Lloyd’s granddaughter and they  live in Japan and  stay in touch through Skype.  This is  great as Lloyd can see Maya as she learns new things and grows and she gets to know her grandpa.

Recipe

 
Stamps: Animal Stories, Enjoy Every Moment

Paper: Whisper White, Regal Rose, Real Red, So Saffron, Pink Pirouette

Ink: Basic Grey, Basic Black

Accessories: Big Shot, Top Note Die, Circle Punch, Light Blue and Dazzling Diamond Stamping Glitter, Cricut Basic Shapes, Butterfly Embosslit Folder, Black Marker, Champagne Glitter


1. The card base is Whisper White and the dimensions are 51/2 x 41/4.

2. The top note was cut using the pink pirouette CS and attached to the Regal Rose layer.

3. The elephant is stamped using basic grey, adding eyelashes with the black marker and dazzling diamond to her spot.

4. The ball is made with the circle punch, stamped with circles from Enjoy Every Moment stamp set and then the blue glitter added.

5. The elephant and ball were layered on a piece of whisper white with the small butterfly cut from the so saffron attached to her trunk.

6. The crown and the letters were cut with the cricut from whisper white and sponged with champagne shimmer ink

So that’s it for today, and I hope you enjoy.
 
Until next time…..
 
Karen

Posted in Animal Stories, Big Shot, Birthday, Cricut

Graduation

Simply Said With Karen Posted on May 12, 2010 by Karen GilbertJune 21, 2024

Stamps: Starring You, Teeny Tiny Wishes
Paper: Basic Grey, Going Grey, Whisper White, So Saffron, DSP
Ink: Basic Grey
Accessories: Cricut Basic Shapes, Brads (other), Ribbon (other)


1. The card base is Going Grey and the dimensions are 5 1/2 x 4 1/4.
2. The DSP was layered on Basic Grey, ribbon attached and layered on the card base
3. The whisper white was randomly stamped with the Starring You image and the wording and layered on basic grey.
4. The stars were cut using the Cricut and attached to the whisper white with the brads.
5. Lastly, the sentiment was stamped using Basic Grey on the card base.

Well, I think I have some time to go and finish up another card…any excuse will do to get the ink on the fingers…ok, maybe it’s relaxing, or gratifying, whatever it is, I enjoy.
 
So, until next time…
 
Karen

Posted in Graduation, Starring You

Happy Mothers Day

Simply Said With Karen Posted on May 9, 2010 by Karen GilbertJune 21, 2024

Happy Mothers Day to all the mothers out there.  Mothers come in many different forms and one doesn’t necessary have to have children to be a mother.  I consider mothers to have a caring and love for someone or something.

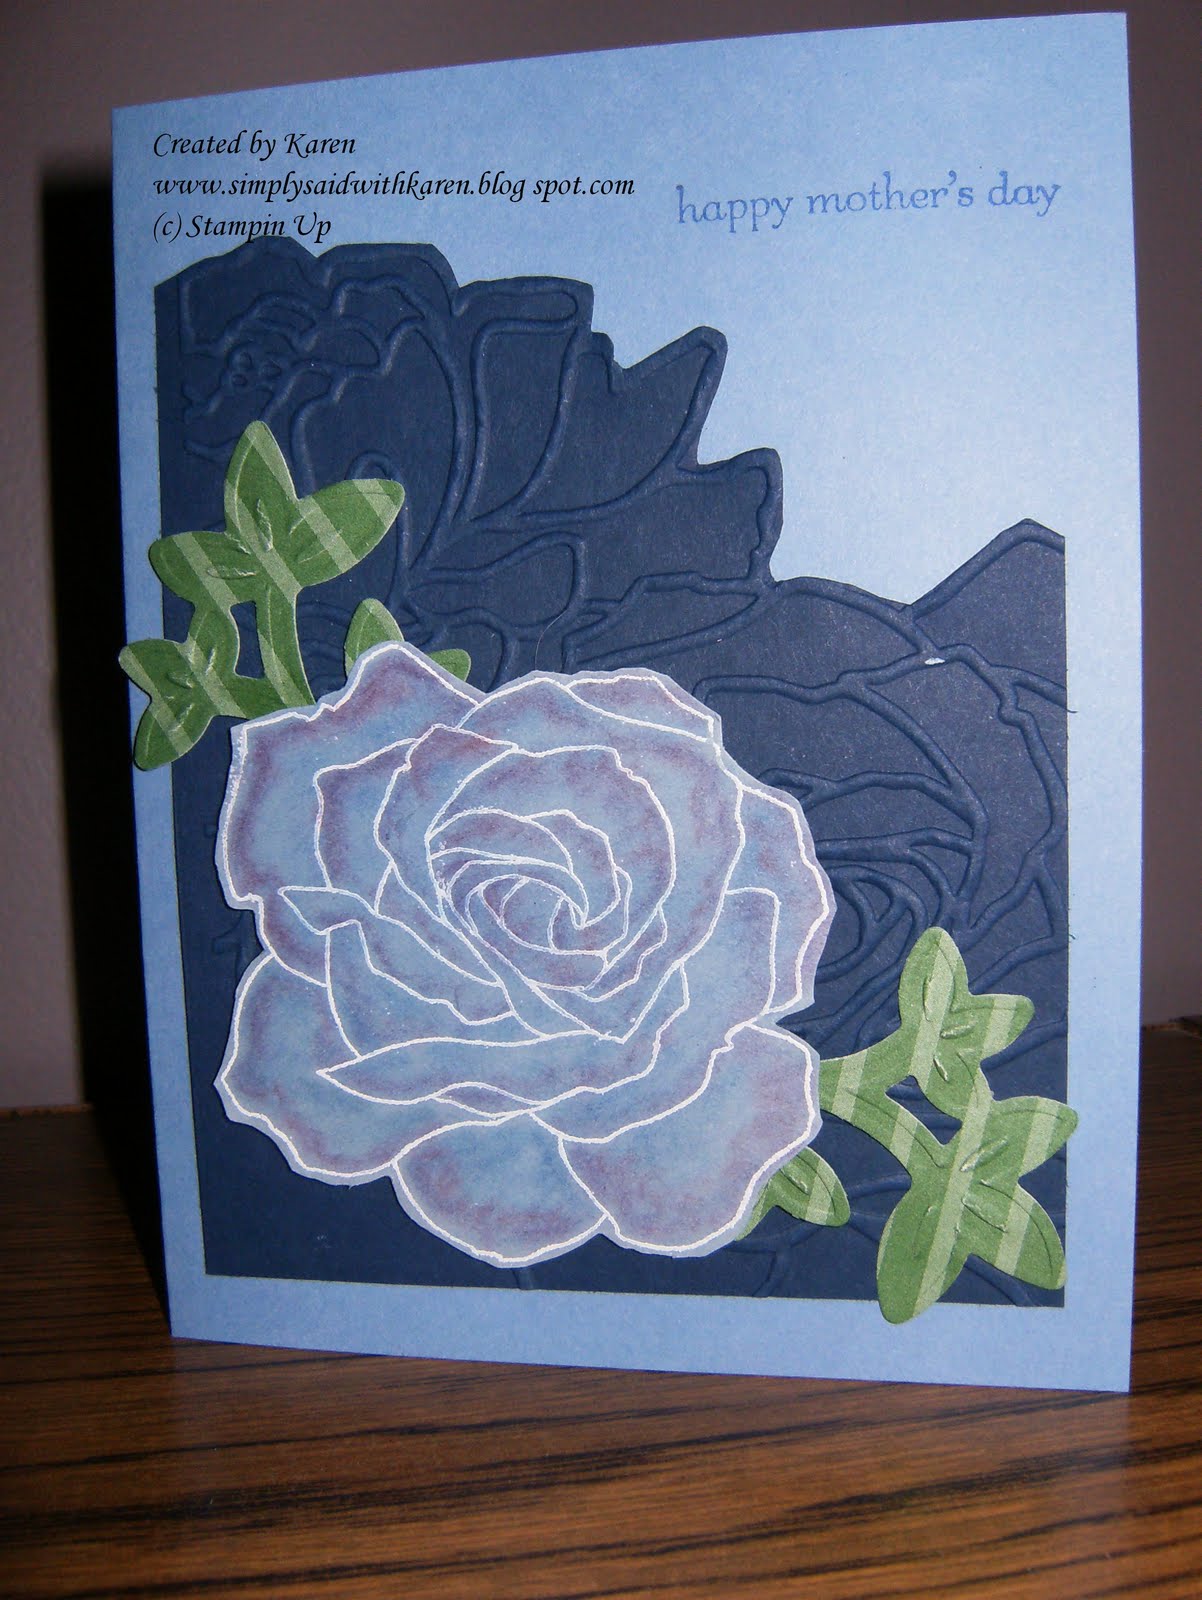
The card today is a Mothers Day card for my daughter.  We just came back from celebrating with the family, my mother, my daughter and my daughter in law, their spouses and children.  It started off to be a picnic, however, we did end up inside as the rain drops started.  It didn’t changed the atmosphere. We had lunch and my son made the dessert…..”Dirt” without the worms.  YEH, Very Good!

Stamps: Fifth Avenue Floral, Teeny Tiny Wishes

Paper: Brocade Blue, Ballet Blue, Night of Navy, DSP

Ink: Ballet Blue, White Craft Ink

Accessories: Big Shot, Manhattan Flower Embossing Folder, Sweetest Stem Embosslit Die, White Embossing Powder, Pastel

Technique:

This card was cased from CKStamps over at http://www.splitcoaststampers.com/gallery/photo/1684537?&cat=16116 using my own colours, etc.

You will also notice that the new blog group has a new name TEN TO TANGO and the links to the blogs are on the right hand side of my blog.  Give them a visit to see what they are up too.

Until next time………

Karen

Posted in Big Shot, Fifth Avenue, Mother's Day

Mother’s Day Part 1

Simply Said With Karen Posted on May 4, 2010 by Karen GilbertMay 4, 2010

Hi everyone and Tuesday is almost over.  I thought I would do a quick post this evening and then shut down the day. 

The card I am sharing today is for Lloyd’s Mom.  I hope she enjoys it.  When I make these cards for others, I am sharing a part of me and that makes me feel good.  It also allows me to use the other side of my brain.

This card was cased from Silki Ledlow over at Splitcoast Stampers

Recipe

Stamps: Vintage Vogue, Teeny Tiny Wishes
Paper: Whisper White, Sweet Pea Designer Paper, Green Textured (Bazzill)
Ink: Regal Rose, Summer Sun, and Perfect Plum
Accessories: Big Shot, Top Note Die Cut, Sweetest Stem Embosslit Die, Brads (other)


1. The card base is whisper white and the dimensions are 5 1/2 x 4 1/4.

2. The DSP was cut to 5 1/4 x 4 and attached to the card base

3. The large and small flowers from the Vintage Vogue set were stamped using different ink colours, cut out with the snips and attached together using brads and attached to the top note die cut. The leaves were attached randomly behind the flowers. I chose the colours based on the DSP.

4. The pearl brads where attached and the top note was attached to the DSP.

5. The sentiment was stamped using perfect plum

Well that’s it for another day.  It’s off to watch NCIS…a favourite.

Until next time………

Karen

Posted in Mother's Day, Vintage Vogue

Inspiration comes from everywhere

Simply Said With Karen Posted on May 2, 2010 by Karen GilbertMay 2, 2010

Hi to everyone and yes, inspiration does come from everywhere.  When you look at nature the different colours can inspire you to create.  How many different greens, reds, yellow, blues do you see out your window.  It’s sometimes just deciding what to use, because really everything goes together.  No longer is there….”blue and green can never to seen”.  So in the end it’s just the decision and sometimes that is hard.

The card I’m sharing today is based on MOJOMonday 136 and somewhat based on CD 64 over at http://www.colordare.blogspot.com/.  It for my BFF’s Mother who is gravely ill and I want her to know that I am thinking about her. 

Recipe

Stamps: Vintage Labels
Paper: Very Vanilla, Textured and Plain CS), Always Artichoke, So Saffron, DSP (retired)
Ink: Always Artichoke
Accessories: Stampin Up original ribbon, dimensionals, 2 step bird punch, eyelet scallop punch (other), Pastels
Technique: Punch Art, Layering


This card is based on MOJOMONDAY 136. The idea of the flowers came from Ruth M on Split Coast Stampers.

1. The card base is the textured very vanilla and is a 5 x 5 square.
2. The eyelet scallop punch is used along one side of a strip of so saffron and attached to the DSP and layered on the card base.
3. The flowers are made using the 2-step bird punch and using the wings. 3 wings are attached together to resemble a flower and each petal was coloured using the pastels to give them dimension. A piece of the leaves are trimmed off and attached to the base of the flowers giving them a cup to rest in. Extra leaves are attached to the stems. All are attached to the plain very vanilla CS and layered onto the always artichoke when then is attached over the DSP. The sentiment is stamped on one of the layers.
4. The ribbon is attached along the bottom and a bird punched from always artichoke is attached using a dimensional.

Enjoy the rest of your Sunday and until next time……..

Karen

Posted in Mojo Monday, Punch Art, Thinking of You

Sharing Another Sympathy Card

Simply Said With Karen Posted on April 29, 2010 by Karen GilbertApril 29, 2010

Hi everyone and welcome to Thursday.  I am off today and supposed to be doing income tax, only 1 more day to file.  But here I am on my blog….it’s called procrastinating.  They will get done by tomorrow.

I have to tell you I also joined a blogging group and I am very excited to be part of this group.  We are a new group and have to decide on a name but once we do, I will share that with you.

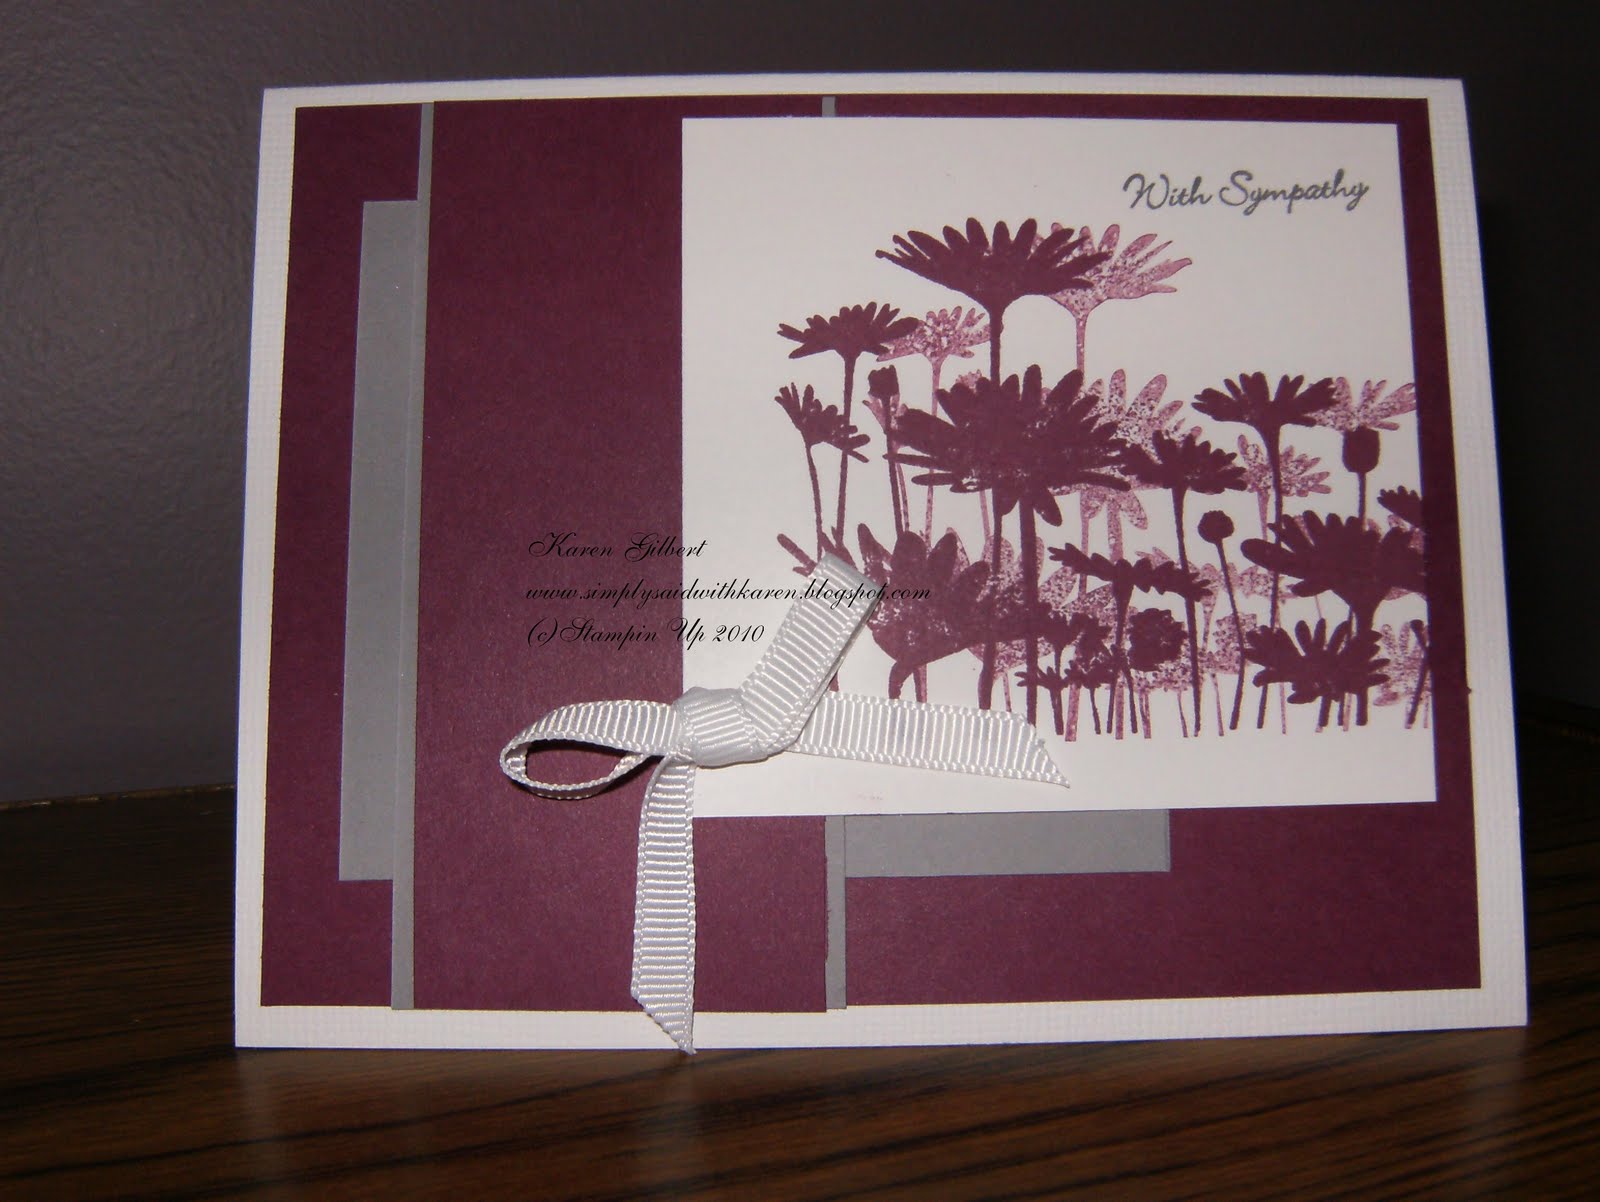
The card I am sharing to day is based on a card by Dawn Easton over at http://www.splitcoaststampers/ although it has my own personal spin on it.  It is a sympathy card….making way too many these days.  I hope you enjoy.

  Recipe
Stamps: Upsy Daisy, Teeny Tiny Wishes
Paper: Whisper White Textured and Plain, Rich Razzleberry, Going Grey
Ink: Rich Razzleberry, Going Grey
Accessories: White Grosgrain Ribbon
Technique: layering, 2-step stamping
The various layers were built using Rich Razzleberry and Going Grey. The Upsy Daisy was stamped on the whisper white CS and then stamped off using the 2-step stamping technique. The sentiment was stamped in the top right hand corner of the whisper white and a ribbon attached to the bottom left.

Have a great day and only 1 more till the weekend.
 
Until later………
 
Karen

Posted in Sympathy, Upsy Daisy

What mixed up weather

Simply Said With Karen Posted on April 27, 2010 by Karen GilbertApril 27, 2010

The weather is not quite sure what it should be doing.  I guess it’s the “April showers bring May flowers”.  It was pouring this morning when I went to work and then this afternoon, the sun came out.  I will take the sun anytime.

The card that I am sharing today is a Sympathy card for a family member that past away last week.  Way too young.  Andrea was a loving wife, mother, daughter and grandmother and she will certainly be missed. 

I wanted to do a simple card and I think that sometimes less is more.

Recipe

Stamps: Asian Artistry, Teeny Tiny Wishes
Paper: Whisper White Textured and Plain, Artichoke, Rose Red, Bride Specialty Paper, Vellum
Ink: Basic Black, Rose Red, Black Stazon Ink
Accessories: Brads (other)
Technique: layering, sponging
The Bride specialty paper was sponged with Rose Red and layered unto whisper white. The Asian Artistry was stamped using Basic Black on whisper white, the velum layered and attached with the brads, and the sentiment stamped with the Black Stazon and dried with the heating tool.
 
Until next time……….
 
Karen

Posted in Asian Artistry, Sympathy

The start of another weekend

Simply Said With Karen Posted on April 23, 2010 by Karen GilbertApril 23, 2010

Happy Friday everyone and welcome to the weekend and enjoy it, they go way toooooooo fast.

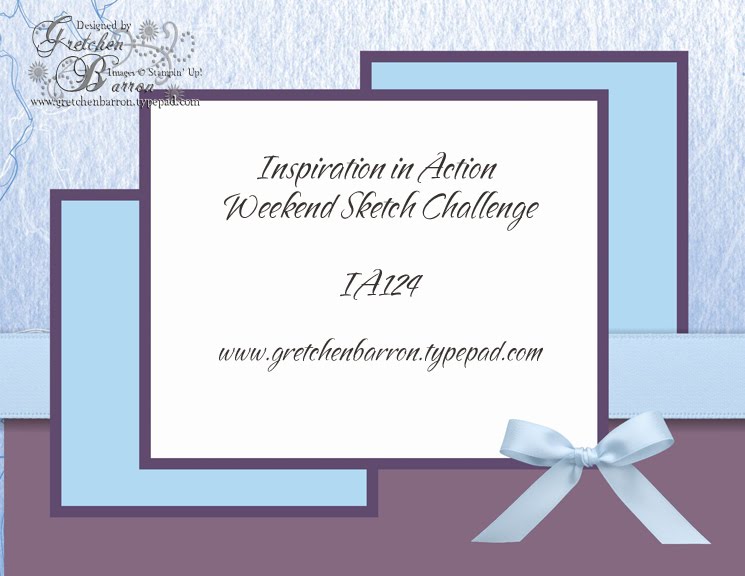
The card that I am posting today is for another co-worker’s birthday.  Her and I have spent holidays together and quite enjoyed ourselves.  I created this card a couple of weeks ago, (trying to plan ahead) and it was based on Inspiration in Action IA 124 over at Gretchen Barron’s blog… www.gretchenbarron.typepad.com

Check out her site as she does beautiful work.

Recipe

Stamps: Vintage Vogue, Happy Moments, Itty Bitty Backgrounds
Paper: Whisper White Textured, Taken with Teal, Blush Blossom, Basic Grey
Ink: Taken with Teal, Going Grey, Basic Black
Accessories: Scallop Trim Corner Punch, Big Shot, Texturz Plates Backgrounds 1 Organza Ribbon, and Dimensionals
Technique: layering

How To

1. Layer 1 Card Base – Whisper White 5 ½” x 4 ¼”
2. Layer 2 – Taken with Teal – 5 ¼” 3 1/2”. Using Big Shot texture this layer. Blush Blossom – 5 ¼” x 1 ½” and attach to the taken with teal layer.
3. Layer 3 – Basic Grey 2 3/8” x 2 3/8” – cut 2 of this layer
4. Layer 4 – Taken with Teal – 1 7/8” x 1 7/8” – cut 2 of this layer
5. Layer 5 – Basic Grey 2 ¾ x 2 ¾”.
6. Layer 6 – Whisper White – 2 7/16” x 2 7/16”. Punch the 4 corners with the Scallop Trim Corner Punch, Stamp the images
7. Attach the Whisper White with the stamped images to the Basic Grey
8. Stamp the flourish image on the 2 Taken with Teal squares and attach to the Basic Grey Square.
9. Attach 1 of the above layers to the right hand side of layer 2 and attach ribbon across the seam between the Taken with Teal and the Blush Blossom
10. Attach the 2 of the above layers to the left side of layer 2.
11. Attach the stamped image in the center of the card.
12. Stamp sentiment and attach ribbon bow to left side of card.

I hope that I can get to me stamping table and get some ink on my fingers over the weekend.  Hope you can too.

Until next time…

Karen

Posted in Birthday, Inspiration in Action, Vintage Vogue

Bella

Simply Said With Karen Posted on April 21, 2010 by Karen GilbertApril 21, 2010

Hi and Happy Wednesday.  Well, I am on day 2 of a fitness program and trying to get the mojo back or at least stop gravity from taking over.

Speaking of mojo, this card was based on MoJo 135 from over at http://www.mojomonday.blogspot.com/.  Check it out for inspiration and you can have a new one each week delivered to your email box.  How easy is that.

This card is for co-worker and friend who is away from home and is celebrating a birthday, so thought the card may make her birthday a little more cheerier.

Recipe

Stamps: Fifth Avenue Floral, Teeny Tiny Wishes
Paper: Ballet Blue, Rose Red, Whisper White, Garden Green, Sweet Pea DP
Ink: Black Embossing Ink, Regal Rose, Rose Red, and Summer Sun
Accessories: Scallop Trim Punch, Big Shot, Manhattan Flower Embossing Folder, Original Ribbon, Black Embossing Powder Blender Pen, X-Large 2-Step Bird Stamp, Dimensionals, Square Scallop punch
Technique: layering

How To

1. Card Base – Ballet Blue 5 ½” x 4 ¼”
2. Layer 1 – Whisper White – 5 ¼” x 4”
3. Layer 2 – Rose Red – 4” x 3” and embossing with Manhattan Flower Embossing Folder
4. Using Black Embossing Ink, stamp Fifth Avenue Floral on Whisper White and emboss using Black Embossing Powder
5. Water colour the rose with various inks using a blender pen, which will create dimension for the rose.
6. Cut out with Paper Snips
7. Cut a strip from the DP 2” x 3” and a 2” x 3” strip from Ballet Blue and punch the long edge using the Scallop Trim Punch. Attach the punched strip to the DP strip.
8. Attach the ribbon and layer the DP over all layers.
9. Attach rose to the card, punch out leaves using the 2 step bird punch and attach to rose
10. Stamp sentiment on whisper white and cut out using square circle punch and cut in half
11. Using the whisper white as a guide, cut out an underlying piece from rose red and attach to card. .

As I promised in my last post, here is a picture of Bella, the puppy. Isn’t she the cutest?

So until next time……….

Karen

Posted in Birthday, Fifth Avenue, Mojo Monday

More Birthdays for April

Simply Said With Karen Posted on April 18, 2010 by Karen GilbertApril 18, 2010

Hello everyone…It’s a beautiful morning and it’s easy to get inspired to do so many things, however, I am going to be finishing up income taxes today and maybe I will get some time to play with the ink.

I am puppy sitting this weekend.  Bella is a pom and about 5 months old, so it is like having a baby in the house…I guess she is a baby. Bella belongs to my son and his family, so that actually makes her a grand-puppy. I don’t have a picture to share with you as she is sleeping peacefully so maybe next time I can share he

Here is a birthday card that I made for my son-in-law’s birthday this week.  This card was fun to make and there will be so much that I can do with it.  One of my next purchases from Stampin Up will the be the Loads of Fun stamp which will extend the possibilities.  These stamp sets “Loads of Love” and the “Loads of Love Accessories” really work well for manly birthday cards. They are fun and whimsical and you can make a variety of cards using them, from birthday to harvest, to Christmas.


All products are Stampin Up unless otherwise noted

Recipe

Stamps: Loads of Love, Loads of Love Accessories
Paper: More Mustard, Baja Blue, Pumpkin Pie, Sweet Pea DP, Textured Basic Brown, Creamy Caramel
Ink: Basic Black, Garden Green, Chocolate Chip
Accessories: Scallop Punch, Big Shot, Matchbox die, Coloured Markers, Brads (other), Dimensionals
Technique: 2 step stamping, layering

How To

1. Card Base done in Creamy Caramel – 51/2 x 41/4
2. Baja Blue – cut 5 ¼” X 4”
3. A strip of textured basic brown punched with the scallop punch on one edge
4. A piece of SPDP cut to resemble a grassy hill
5. The truck stamped with basic black on the pumpkin pie and cut out
6. The pieces were layered and assembled on the baja blue and the truck placed so that it looks like it’s travelling down a road.
7. The presents, the trees and the man figure were stamped using the 2 step stamping technique. The trees where stamped using both the garden green and chocolate chip ink and the presents were coloured using various markets
8. The sentiment is stamped on a piece of creamy caramel from the label portion of the matchbox die and accessorized with the brads and attached to the card using dimensionals

I hear the birds singing outside, the sun is shining and everything is right with the world.

So, until next time…………

Karen

Posted in Birthday, Loads of Love, Two Step Stamping

Dad’s Birthday

Simply Said With Karen Posted on April 13, 2010 by Karen GilbertJune 21, 2024

Masculine cards are always difficult, although I have seen flowers on a card for a gentleman and it was very effective. I made this card based on the sketch MOJO 133. This site is such a great source on inspiration. If you have a chance, please give it a visit at http://www.mojomonday.blogspot.com/

This card is for my Dad’s Birthday this month….he is 86 years young.  Can you imagine the changes that he has seen in the world over 86 years?  Amazing…one tool that we use frequently, the computer was not even thought of. 

Recipe
Stamps: Happy Moments
Paper: Really Rust, Old Olive, Creamy Caramel, Sweet Pea DP
Ink: Stazon Black, Basic Black
Accessories: Oval Die Cuts (Cricut), Brads (other), Corner Punch, Dimensionals
Technique: Layering

 
How To


1. Card Base done in Really Rust – 51/2 x 41/4
2. Sweet Pea DP cut 11/2” x 13/4” and 11/2” x 11/2” and layered on Old Olive cut 2” x 21/4” and 2” x 2”
3. The larger layer is attached to the top of the card base and the smaller layer is attached to the lower third of the card
4. A strip of really rust was cut 4” x 11/4” and layered in the middle and then the flag in creamy caramel was cut 3” x 11/2”. The points of the flag were cut using the corner punch.
5. A larger oval, 21/2” x 31/2” was cut from the creamy caramel and a smaller oval, 3” x 2” was cut from really rust
6. The image was stamped on the really rust and coloured using marker and the sentiment stamped
7. Brads attached
8. Attach layers using a dimensional for the ovals

And that’s it and now my Dad has his birthday card.

So until next time………..

Karen


Posted in Birthday, Mojo Monday

Co Worker Appreciation and Candy Machine

Simply Said With Karen Posted on April 11, 2010 by Karen GilbertApril 11, 2010

Why does income tax come the same time every year?  I spent yesterday trying to get it done and I almost made it, just a few things to tidy up and I gave myself permission not to work on it today.  Instead, I will work on my cards, visit my parents and generally just have a restful day to get ready for the week ahead.

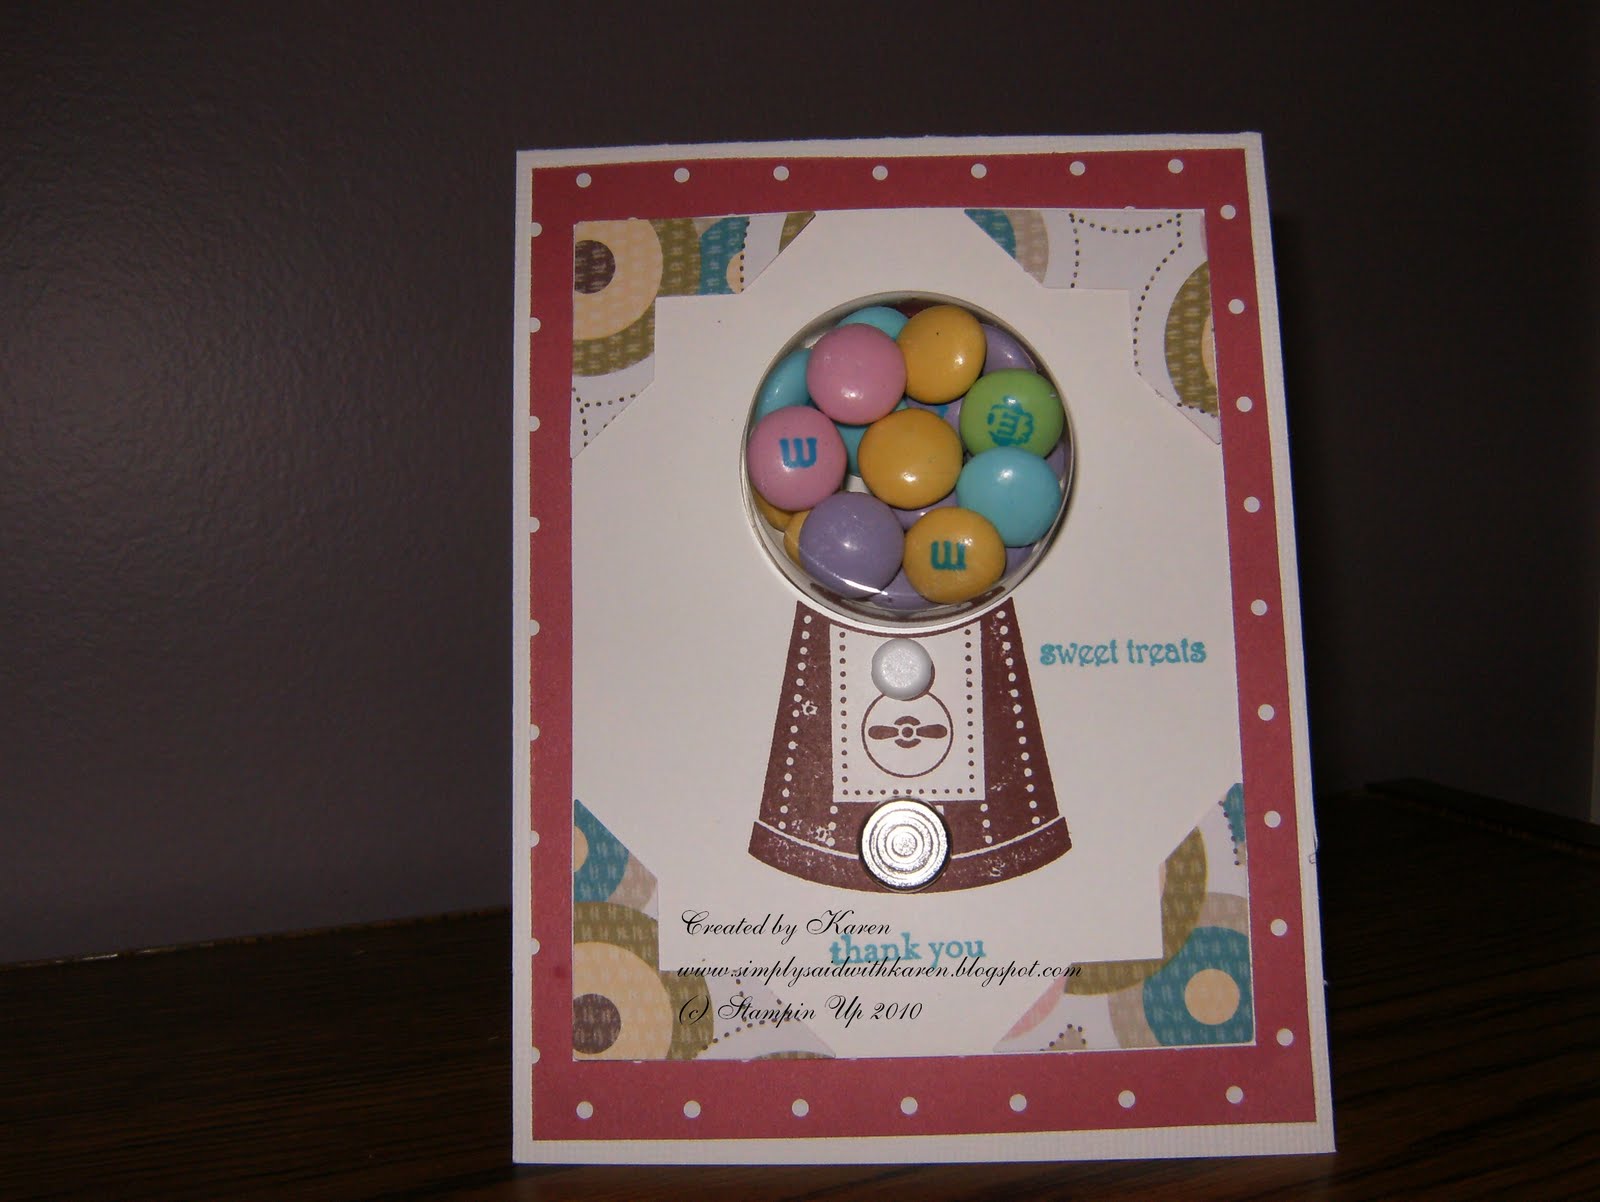
The card for today is one that I did for a couple of co-workers who travelled with me to Toronto.  I wanted to show my appreciation for the time and effort that they spent in getting the “job done”….

Recipe

Stamps: Something Sweet, Teeny Tiny Wishes
Paper: Whisper White Textured, Sweet Pea DP, Whisper White
Ink: Bravo Burgundy, Taken With Teal

Accessories: Sweet Cups, Corner Punch, 13/4” Circle Punch, Circle Designer Brads, Neutral Brads
Technique: Punch Art

How To
1. Card Base done in Textured Whisper White – 51/2 x 41/4
2. Sweet Pea DP cut 51/4 x 4
3. Large corners layered on Whisper White
4. Circle punch just above the candy machine and insert the sweet cup and fill with whatever you like
5. Candy Machine stamped on Whisper White
6. Brads attached
7. Sentiments stamped in Taken with Teal
8. Attach layers

I hope you enjoy and until next time…….

Karen

Posted in Sweet Cups, Thank You

Post navigation

← Older posts
Newer posts →

  • Facebook
  • Instagram
  • Pinterest
  • YouTube

Event Calendar

Categories

Painted Lavender

Inspirations in Ink January 2024 Tutorial. Earn this tutorial for free when you order totals $50.00 or more.
Tutorials are designed by Global Stampin' Up! Demonstrators.
Contact me if you wish to purchase the tutorial. mailto:karen@simplysaidwithkaren.com

2024 Coupons
Earn Bonus Coupons when you spend $60 CDN during July. Redeem them in August

©2026 - Simply Said With Karen - Weaver Xtreme Theme Privacy Policy
↑ Scroll Up
Verified by MonsterInsights